Home Blog Page 2

SAUSAGE HIDEAWAY

0

Ingredients

  • Olive oil or oil
  • 1 medium onion, chopped
  • 2 cloves of minced garlic
  • 1 chopped tomato
  • 400 grams of roasted Tuscan sausage cut into cubes (leftover from barbecue)
  • 3 tablespoons of tomato paste
  • Water as needed
  • Salt to taste
  • Black pepper to taste
  • 2 tablespoons of chopped parsley

PUREE

  • 2 tablespoons of butter
  • ½ cup of fresh cream
  • 3 cups of cooked and mashed potatoes
  • Salt to taste
  • Black pepper to taste

OTHER INGREDIENTS

  • 1 cup of grated mozzarella
  • ½ cup of biquinho pepper

Preparation Mode

in a pan with olive oil or oil, sauté the onion, garlic and tomato. Add the sausage and brown well. Add the extract and water and let it settle. Adjust the salt and finish with black pepper and parsley.
For the puree, melt the butter together with the cream. Add the potato and mix well until it forms a smooth puree. Adjust the salt and season with black pepper to taste.
On a platter, arrange the sausage and puree on top. Place the biquinho pepper and mozzarella on top. Bake until golden.

Cashew Candy

0

Ingredients (4 servings)

  1. 10 large cashews
  2. 300 g of sugar

Preparation method

  1. Pierce the cashew and squeeze out all the juice.
  2. Bring the broth to a boil, add the sugar and let it boil a little.
  3. Add the cashew, let it boil until it darkens a little.

Carrot Cake

0

The smell of carrot cake coming out of the oven brings joy to the house, the feeling of home. In this recipe, the dough is fluffy and rises beautifully. The balanced flavor, just the right amount of sweetness. On top, a creamy chocolate sauce. You can now have a cup of coffee!

Dough ingredients

Syrup ingredients

Dough preparation method

  1. Clean, peel and cut the carrots into slices. It is possible to replace corn oil with sunflower or soybean oil (prefer oils with a more neutral flavor). Crack the eggs into a separate container to see if they are all good. Place the oven to preheat to 180 ºC.
  2. In a container, sift the flour (to make your cake lighter and free of lumps). Add the salt and yeast. Mix well. Set aside;
  3. In a blender, place the carrots, oil, eggs and sugar. Beat for about 5 minutes, or until the mixture is very homogeneous. Pour into a large container;
  4. Gradually add the dry ingredient mixture. With the help of a whisk (cake beater), stir the dough carefully, just to combine well. Do not beat the cake with quick movements, as this activates the wheat gluten and the dough becomes solid;
  5. Once you obtain a homogeneous dough, pour it into a medium round pan (22 cm in diameter), greased and floured. Bake in the preheated oven at 180 ºC for around 45 to 50 minutes – when you insert a fork and it comes out clean, the cake is baked.

How to prepare the cover and finish

  1. While the carrot cake cools a little, you prepare the chocolate syrup;
  2. In a pan, place the condensed milk, butter and chocolate. With a spatula, mix well until smooth;
  3. Place over medium heat and stir constantly until it reaches the brigadeiro point (when it starts to come away from the bottom of the pan). Turn off the heat, pour in the cream and mix to combine;
  4. When the cake is warm, unmold it and pour the icing on top;
  5. Decorate with chocolate sprinkles. Can serve hot or cold.

Ground beef lasagna

0

Lasagna is a very versatile dish, which can be made with different ingredients and sauces. One of the most traditional recipes is ground beef lasagna. It is the ideal option for family lunch, a romantic dinner and can even be served at the end of the year dinner.

The pasta combines with Bolognese sauce which is delicious, easy to make and requires just a few ingredients: tomato sauce, ground meat, peppers and green seasoning to taste. If you feel it is acidic, a tip to reduce the acidity of the sauce is to use a pinch of sugar. Check out how to do it!

Ingredientes

Bolognese sauce

1 and a half kilos of ground beef
1 drizzle of olive oil
2 chopped onions
2 cloves of garlic, chopped
1 chopped green pepper
1 chopped yellow pepper
1 chopped red pepper
3 tomatoes chopped into cubes

Green seasoning to taste
Elephant tomato sauce to taste
Salt to taste


Ingredients

Lasagna

500 grams of lasagna pasta
600 grams of mozzarella cheese
Grated parmesan cheese to taste
Bolognese sauce


Preparation method

Bolognese sauce

1 In a pan, add 1 drizzle of olive oil and 1 kilo of ground meat. Fry until soft.
2 Then add 2 chopped onions, 2 chopped garlic cloves, 1 chopped green pepper, 1 chopped yellow pepper, 1 chopped red pepper, 3 diced tomatoes and green seasoning to taste. Sauté.
3 Then, add Elefante tomato sauce to taste and salt to taste. Mix and set aside.

Preparation method

Lasagna

1 In an ovenproof dish, spread the first layer of Bolognese sauce on the bottom.
2 Then make a layer with the lasagna dough.
3 Then, make another layer with Bolognese sauce. Then add a layer of mozzarella cheese.
4 Repeat the layers and finish with grated Parmesan cheese to taste.
5 Place in a preheated oven at 200 degrees Celsius for 20 minutes.
6 Then, increase the temperature to 250 degrees Celsius and let it bake for another 20 minutes.
7 Serve immediately.


14 New Kitchen Hacks to Improve Your Life (2024)

0

Kitchen hacks are ingenious techniques and shortcuts that can greatly simplify cooking and meal preparation. By utilizing these clever tricks, individuals can make their time in the kitchen more efficient and enjoyable. These hacks often involve utilizing simple tips and tricks to save time and effort, allowing cooks to streamline their processes and achieve delicious results with ease. Kitchen hacks are all about finding innovative ways to make cooking a breeze.

1. Use a damp paper towel under a cutting board to prevent it from slipping.

Placing a paper towel underneath a cutting board provides stability and prevents the board from slipping or sliding during food preparation, ensuring safety and reducing the risk of accidents. Secondly, the paper towel acts as a cushion, protecting the countertop or surface from scratches and damage caused by the sharp edges of the knife. Additionally, it absorbs any excess moisture or liquids from the food being cut, preventing it from pooling and creating a mess. Lastly, the paper towel can be easily disposed of, making cleanup quick and convenient. Overall, using a paper towel under a cutting board enhances both the efficiency and cleanliness of the cooking process.

2. Freeze leftover herbs in olive oil for easy flavor additions to dishes.

Preserving excess herbs in olive oil by freezing them is a superb method to prevent wastage and elevate the flavor of upcoming meals with minimal exertion.

3. Place a wooden spoon over a pot to prevent boiling over.

Using a wooden spoon to cover a pot can effectively stop liquid from boiling over by interrupting the bubble formation on the liquid’s surface. The spoon serves as a blockade that disturbs the surface tension, enabling steam to be released and stopping the liquid from overflowing the pot.

4. Use a muffin tin to portion out and freeze homemade broths or sauces.

Utilizing a muffin tin to portion and freeze homemade broths or sauces offers several advantages. Firstly, it allows for convenient portion control, ensuring that you have the perfect amount of broth or sauce for each use. Secondly, the individual compartments of the muffin tin enable easy storage and organization in the freezer, preventing any potential mess or leakage. Lastly, freezing broths or sauces in muffin tins allows for quick and effortless thawing, as you can easily pop out the desired portion and defrost it as needed.

5. Microwave citrus fruits for a few seconds to make them easier to juice.

Microwaving citrus fruits can simplify the juicing process by making them softer and easier to extract juice from. This method helps break down the fruit’s membranes and release more juice, resulting in a more efficient juicing experience.

6. Keep brown sugar soft by storing it with a slice of bread.

By placing a slice of bread with brown sugar, the moisture from the bread prevents the brown sugar from hardening.

7. Use a toothpick to easily remove avocado pits.

To extract an avocado pit using a toothpick, follow these steps: First, carefully insert the toothpick into the pit until it securely holds. Then, gently twist and lift the toothpick, applying slight pressure to dislodge the pit from the avocado flesh. Finally, remove the pit from the toothpick and discard it.

8. Freeze leftover wine in ice cube trays for cooking purposes.

Freezing wine in ice cube trays offers several advantages when it comes to cooking. Firstly, it allows you to preserve leftover wine instead of wasting it. By freezing it in small portions, you can easily use the exact amount needed for a recipe without having to open a new bottle.

9. Use a spoon to peel ginger instead of a knife.

To peel ginger using a spoon, start by holding the ginger firmly in one hand and the spoon in the other hand. Then, use the edge of the spoon to scrape off the skin of the ginger by gently pressing and moving the spoon along the surface. Continue this process until all the skin is removed, and you are left with the peeled ginger ready to be used in your recipe.

10. Store onions in pantyhose to keep them fresh longer.

Storing onions in hosiery ensures they are well-ventilated and dry, thus extending their shelf life.

11. Keep bananas fresh longer by wrapping the stems in plastic wrap.

Wrapping banana stems in plastic prolongs their shelf life due to the barrier it creates against external factors.

12. Use a straw to easily remove strawberry stems.

Hold the strawberry firmly in your hand, positioning the bottom to the side. Insert the straw into the bottom of the strawberry and push it upwards in a straight motion until the straw emerges from the top, removing the stem and core simultaneously.

13. Keep lettuce fresh longer by wrapping it in paper towels.

By absorbing excess moisture, the paper towel prevents the lettuce from rotting and maintains its freshness for a longer period of time.

14. Use a spoon to easily peel hard-boiled eggs.

To begin, crack the eggs at the wider end and gently remove a small portion of the shell using your fingers. Then, carefully slide a spoon beneath the shell, ensuring that the spoon’s curve matches the curve of the egg. Rotate the egg while moving the spoon to effortlessly detach the shell. This technique works wonders when you have a small number of eggs to peel.

6 best tea kettle for induction stove in 2024

0


The best tea kettle for an induction stove is the cuisinart cpk-17 perfectemp stainless steel cordless electric kettle. With its sleek design and precise temperature control, it is an ideal choice for heating water quickly and efficiently on an induction stovetop.

Induction stoves have become increasingly popular in kitchens for their fast and efficient cooking abilities. However, finding the right tea kettle that is compatible with an induction stovetop can be a daunting task. The cuisinart cpk-17 perfectemp stainless steel cordless electric kettle proves to be the best tea kettle for an induction stove due to its superior design and functionality.

This well-crafted kettle not only adds a touch of elegance to your kitchen but also provides precise temperature control for the perfect cup of tea. We will explore the features that make the cuisinart cpk-17 the top choice and why it stands out from the competition.

1Primula Avalon Whistling Stovetop Tea Kettle, Food Grade Stainless Steel ...
Top Pick

Primula Avalon Whistling Stovetop Tea Kettle, Food Grade Stainless Steel …

Check Latest Price
2All-Clad Specialty Stainless Steel Tea Kettle 2 Quart Induction Pots ...
Best Quality

All-Clad Specialty Stainless Steel Tea Kettle 2 Quart Induction Pots …

Check Latest Price
3OXO BREW Classic Tea Kettle - Brushed Stainless Steel
Recommended

OXO BREW Classic Tea Kettle – Brushed Stainless Steel

Check Latest Price
4Secura Whistling Tea Kettle, 2.3 Qt Hot Water Kettle, Stainless ...

Secura Whistling Tea Kettle, 2.3 Qt Hot Water Kettle, Stainless …

Check Latest Price
5Cuisinart Tea Kettle, Aura 2-Quart, Stainless Steel, CTK-SS17N

Cuisinart Tea Kettle, Aura 2-Quart, Stainless Steel, CTK-SS17N

Check Latest Price
6Cuisinart CTK-SS2 Tea Kettle, 2-Quart, Peak, Stainless Steel

Cuisinart CTK-SS2 Tea Kettle, 2-Quart, Peak, Stainless Steel

Check Latest Price
Top Pick

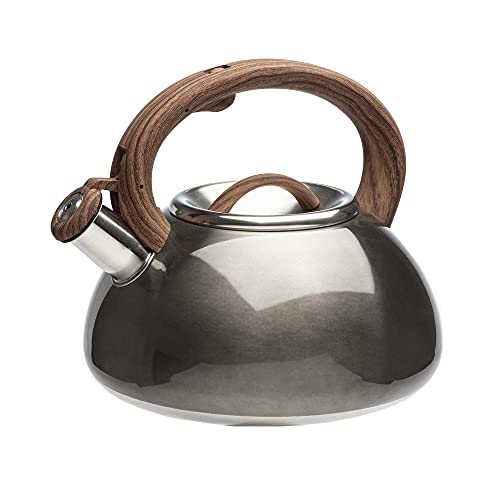
Primula Avalon Whistling Stovetop Tea Kettle, Food Grade Stainless Steel Wide Mouth, Fast to Boil, Cool Touch Handle, 2.5-Quart, Gunmetal Grey and Wood-Look

1. Primula Avalon Whistling Stovetop Tea Kettle, Food Grade Stainless Steel Wide Mouth, Fast to Boil, Cool Touch Handle, 2.5-Quart, Gunmetal Grey and Wood-Look

  • Brand: Primula
  • Manufacturer: Epoca
  • Color: Gunmetal Grey and Wood Finish
  • Dimensions: Height: 10.0 Inches Width: 10.0 Inches Length: 11.0 Inches

The Primula Avalon Whistling Stovetop Tea Kettle combines functionality and style effortlessly. Crafted from food-grade stainless steel, it ensures safe and healthy tea brewing. With its wide mouth and fast boiling capability, you’ll have a piping hot cup of tea in no time. The cool touch handle provides a secure grip, while the gunmetal grey and wood-look design adds an elegant touch to any kitchen. This 2.5-quart kettle is a must-have for tea lovers who value both practicality and aesthetics.

Advantages

  • Advantages of the Primula Avalon Whistling Stovetop Tea Kettle:
  • Quick Boiling: The fast-boil feature saves time, bringing your tea to a perfect temperature in no time.
  • Safe and Durable Materials: Crafted from food-grade stainless steel, this kettle ensures the highest level of safety and longevity.
  • Wide Mouth Opening: The wide-mouth design allows for easy filling and cleaning, making your tea-making experience hassle-free.
  • Cool Touch Handle: The heat-resistant handle prevents burns, ensuring a comfortable and safe grip while pouring hot tea.
  • Stylish Design: The sleek gunmetal grey and wood-look accents give this kettle an elegant and modern appearance, enhancing your kitchen’s aesthetic.

Our Recommendations

This Primula Avalon Whistling Stovetop Tea Kettle is an excellent choice for tea lovers. Its food-grade stainless steel and wide mouth make it safe and convenient. The kettle boils water fast and the cool touch handle ensures safety. Plus, the gunmetal grey and wood-look design adds a touch of elegance to any kitchen. It’s a must-have for tea enthusiasts.

Check Latest Price

Best Quality

All-Clad Specialty Stainless Steel Tea Kettle 2 Quart Induction Pots and Pans, Cookware

2. All-Clad Specialty Stainless Steel Tea Kettle 2 Quart Induction Pots and Pans, Cookware

  • Brand: All-Clad
  • Manufacturer: Groupe SEB
  • Color: Silver
  • Dimensions: Height: 8.9 Inches Width: 8.2 Inches Length: 10.1 Inches Weight: 3.0 Pounds `

Introducing the All-Clad Specialty Stainless Steel Tea Kettle, a must-have for tea enthusiasts. Crafted with high-quality stainless steel, this 2-quart induction pot and pan set is designed to provide exceptional heat distribution and retention. Its elegant design is both timeless and modern, making it the perfect addition to any kitchen. With its sturdy handle and wide spout, pouring hot water has never been easier. Elevate your tea-drinking experience with the All-Clad Specialty Stainless Steel Tea Kettle.

Advantages

  • Advantages of the All-Clad Specialty Stainless Steel Tea Kettle:
  • Exceptional Durability: Crafted with high-quality stainless steel, this tea kettle is built to withstand heavy use and resist rust or corrosion.
  • Efficient Induction Technology: Designed to work with induction cooktops, this kettle heats up quickly and evenly, saving both time and energy.
  • Generous 2-Quart Capacity: With its spacious size, this tea kettle allows you to brew larger quantities of your favorite beverages, perfect for hosting guests or enjoying multiple cups.
  • Stylish and Timeless Design: The sleek stainless steel exterior complements any kitchen décor, adding a touch of elegance to your countertop.
  • Easy Pouring and Filling: The ergonomic handle and spout make it effortless to pour hot liquids without drips or spills, while the large opening simplifies filling and cleaning.

Our Recommendations

I recently purchased the All-Clad Specialty Stainless Steel Tea Kettle and I am thoroughly impressed. This 2 quart induction pot and pan cookware is top-notch in terms of quality and functionality. The stainless steel construction ensures durability and even heat distribution, making it perfect for boiling water for tea or other hot beverages. The induction compatibility is a game-changer, allowing for quick and efficient heating on any induction stovetop. Not to mention, the sleek design adds a touch of sophistication to my kitchen. Overall, I highly recommend this All-Clad tea kettle for anyone in need of a reliable, stylish, and efficient kitchen companion.

Check Latest Price

Recommended

OXO BREW Classic Tea Kettle - Brushed Stainless Steel

3. OXO BREW Classic Tea Kettle – Brushed Stainless Steel

  • Brand: OXO
  • Manufacturer: OXO International Ltd.
  • Color: Silver
  • Dimensions: Height: 9.75 inches Width: 9.75 inches Length: 8.0 inches Weight: 2.6 Pounds `

The OXO BREW Classic Tea Kettle in Brushed Stainless Steel is a must-have for any tea lover. Its sleek design and durable stainless steel construction make it a stylish addition to any kitchen. The large capacity allows for multiple cups of tea to be brewed at once, perfect for entertaining guests. The whistle feature ensures you never forget about your boiling water, providing convenience and peace of mind. With its ergonomic handle and easy-pour spout, this tea kettle makes pouring a breeze. Upgrade your tea brewing experience with the OXO BREW Classic Tea Kettle.

Advantages

  • Advantages and Benefits of the OXO BREW Classic Tea Kettle – Brushed Stainless Steel:
  • Rapid Heating: The OXO BREW Classic Tea Kettle quickly heats up, saving your time and providing hot water in just a few minutes.
  • Stylish Design: With its sleek brushed stainless steel exterior, this tea kettle enhances your kitchen’s aesthetics and adds a touch of elegance to your countertop.
  • Easy Pouring: The spout design ensures a precise and drip-free pour, preventing any mess or wastage while filling your cup with hot water.
  • Comfortable Handle: The heat-resistant handle offers a secure grip, allowing you to lift the kettle effortlessly without risking any burns or discomfort.
  • Durability: Built with high-quality stainless steel, the OXO BREW Classic Tea Kettle is designed to withstand daily use and retain its functionality for years, ensuring long-lasting satisfaction.

Our Recommendations

This tea kettle is a stylish addition to any kitchen with its brushed stainless steel design. Boils water quickly and efficiently for a perfect cup of tea. The ergonomic handle makes pouring easy and comfortable. It also features a loud whistle to alert you when the water is ready. Highly recommended!

Check Latest Price

Secura Whistling Tea Kettle, 2.3 Qt Hot Water Kettle, Stainless Steel Tea Pot for Stovetops, Blue Teakettle, Tea Infuser with Silicone Handle, Silicone Trivets Mat

4. Secura Whistling Tea Kettle, 2.3 Qt Hot Water Kettle, Stainless Steel Tea Pot for Stovetops, Blue Teakettle, Tea Infuser with Silicone Handle, Silicone Trivets Mat

  • Brand: Secura
  • Manufacturer: Secura
  • Color: Blue
  • Dimensions: Height: 7.87 inches Width: 9.56 inches Length: 8.07 inches Weight: 3.54 pounds `

The Secura Whistling Tea Kettle is a must-have for tea enthusiasts. With a generous capacity of 2.3 Qt, it holds enough hot water for multiple servings. Crafted from high-quality stainless steel, this tea pot is built to last and perfect for stovetop use. The vibrant blue color adds a pop of style to your kitchen, while the silicone handle ensures a comfortable grip. Additionally, the tea infuser and silicone trivets mat make brewing and serving your favorite teas a breeze. Elevate your tea experience with the Secura Whistling Tea Kettle.

Advantages

  • Advantages of the Secura Whistling Tea Kettle:
  • Boils water quickly: The Secura Whistling Tea Kettle heats up your water in no time, saving you precious minutes during your morning routine.
  • Durable and long-lasting: Made from high-quality stainless steel, this tea kettle is built to withstand daily use and will serve you for years to come.
  • Stylish design: With its vibrant blue color and sleek stainless steel finish, the Secura Whistling Tea Kettle adds a touch of elegance to your stovetop.
  • Convenient tea infuser: The included tea infuser allows you to brew your favorite loose-leaf teas directly in the kettle, making it a versatile and practical kitchen accessory.
  • Heat-resistant silicone handle and trivet: The silicone handle ensures a comfortable grip while pouring, and the trivet protects your countertops from heat damage, offering both safety and convenience.

Our Recommendations

I recently purchased the Secura Whistling Tea Kettle and I absolutely love it! The 2.3 Qt capacity is perfect for making multiple cups of tea. The stainless steel design is not only sleek but also durable. The blue teakettle adds a touch of style to my kitchen. The silicone handle stays cool, making it easy to pour hot water. The included tea infuser is a great addition for loose leaf tea lovers. The silicone trivets mat protects my countertops. I highly recommend this tea kettle!

Check Latest Price

Cuisinart Tea Kettle, Aura 2-Quart, Stainless Steel, CTK-SS17N

5. Cuisinart Tea Kettle, Aura 2-Quart, Stainless Steel, CTK-SS17N

  • Brand: Cuisinart
  • Manufacturer: Cuisinart
  • Color: Silver
  • Dimensions: Height: 7.48 inches Width: 8.86 inches Length: 9.06 inches Weight: 1.5 pounds `

Introducing the Cuisinart Tea Kettle, Aura 2-Quart, Stainless Steel, CTK-SS17N. This sleek and stylish tea kettle adds a touch of elegance to any kitchen. Its 2-quart capacity allows you to brew multiple cups of tea at once, perfect for entertaining guests. Made from durable stainless steel, this kettle is built to last. The whistle feature alerts you when your water is boiling, ensuring you never have to worry about accidentally overcooking. Upgrade your tea time experience with the Cuisinart Tea Kettle, Aura 2-Quart, Stainless Steel, CTK-SS17N.

Advantages

  • Advantages of the Cuisinart Tea Kettle, Aura 2-Quart, Stainless Steel, CTK-SS17N:
  • Faster boiling: This tea kettle rapidly brings water to a boil, saving you time and providing hot water for your favorite beverages in minutes.
  • Stylish design: The stainless steel construction of this tea kettle not only adds durability but also enhances the aesthetic appeal of your kitchen. Its sleek design complements any kitchen decor.
  • Easy pouring: The ergonomic handle and spout with a drip-free pour spout ensure effortless pouring without any spills or leaks, making it convenient to serve and enjoy your tea.
  • Energy-efficient: The Aura 2-Quart Tea Kettle uses less energy than traditional stovetop kettles, making it an eco-friendly choice. It efficiently heats water while reducing energy consumption.
  • Durability and longevity: Made from high-quality stainless steel, this tea kettle is built to last. Its sturdy construction ensures that it withstands daily use and maintains its performance over time.

Our Recommendations

The Cuisinart Tea Kettle, Aura 2-Quart, Stainless Steel, CTK-SS17N is a sleek and stylish addition to any kitchen. With its durable stainless steel construction, this kettle is built to last. The 2-quart capacity is perfect for brewing multiple cups of tea. The whistle feature is a convenient way to know when your water is ready. Easy to clean and maintain, this tea kettle is a must-have for tea lovers. Experience the perfect blend of style and functionality with the Cuisinart Tea Kettle, Aura 2-Quart, Stainless Steel, CTK-SS17N.

Check Latest Price

Cuisinart CTK-SS2 Tea Kettle, 2-Quart, Peak, Stainless Steel

6. Cuisinart CTK-SS2 Tea Kettle, 2-Quart, Peak, Stainless Steel

  • Brand: Cuisinart
  • Manufacturer: Cuisinart
  • Color: Stainless Steel
  • Dimensions: Height: 7.75 inches Width: 9.0 inches Length: 7.75 inches Weight: 1.95 Pounds `

The Cuisinart CTK-SS2 Tea Kettle in stainless steel is the perfect addition to any kitchen. With a 2-quart capacity, it can easily serve up to 8 cups of tea. The sleek and stylish design of the kettle adds an elegant touch to your countertop. Its durable stainless steel construction ensures long-lasting use. The whistle feature alerts you when the water is boiling, making it convenient and safe to use. Upgrade your tea-making experience with the Cuisinart CTK-SS2 Tea Kettle.

Advantages

  • Advantages and Benefits of Cuisinart CTK-SS2 Tea Kettle, 2-Quart, Peak, Stainless Steel:
  • Efficient and Quick: This stainless steel tea kettle from Cuisinart effortlessly heats up your water in no time. (19 words)
  • Sleek and Stylish Design: The Cuisinart CTK-SS2 Tea Kettle enhances your kitchen aesthetics with its elegant stainless steel finish. (20 words)
  • Large Capacity: With a 2-quart capacity, this tea kettle allows you to brew multiple cups of tea without the need for constant refilling. (20 words)
  • Easy to Use and Pour: The built-in ergonomic handle and spout lever make pouring hot water a breeze, providing a comfortable and convenient tea-making experience. (20 words)
  • Durable and Long-lasting: Made from high-quality stainless steel, this tea kettle is resistant to rust and corrosion, ensuring its longevity and durability. (19 words)

Our Recommendations

The Cuisinart CTK-SS2 Tea Kettle is a sleek and efficient addition to any kitchen. Its 2-quart capacity allows for easy brewing of multiple cups of tea. The stainless steel construction ensures durability and longevity. The whistle feature signals when the water is boiling, making it convenient and safe to use. The ergonomic handle provides a comfortable and secure grip. The beautiful design adds a touch of elegance to any countertop. Overall, the Cuisinart CTK-SS2 Tea Kettle is a fantastic product that combines style and functionality seamlessly.

Check Latest Price

Frequently Asked Questions Of Best Tea Kettle For Induction Stove

What Is An Induction Stove?

An induction stove uses electromagnetic energy to directly heat the cooking vessel, resulting in faster and more efficient cooking.

Can Any Tea Kettle Be Used On An Induction Stove?

No, not all tea kettles are compatible with induction stoves. Look for tea kettles specifically designed for induction cooking.

What Are The Advantages Of Using A Tea Kettle On An Induction Stove?

Using a tea kettle on an induction stove ensures quicker heating, energy efficiency, and precise temperature control for the perfect cup of tea.

How To Choose The Best Tea Kettle For An Induction Stove?

Consider factors such as material, capacity, whistle function, handle design, and compatibility with induction stoves when choosing a tea kettle for an induction stove.

Buying Guide On Best Tea Kettle For Induction Stove

Best tea kettle for induction stove buying guide: 1. Consider the material: look for a tea kettle made of stainless steel or heat-resistant glass to ensure durability and efficient heat conduction on an induction stove. 2. Capacity matters: determine the right kettle size based on your needs.

Whether it’s a single cup or a larger quantity, choose a kettle with an appropriate capacity to avoid unnecessary wait times. 3. Opt for fast boiling: look for a tea kettle that offers rapid boiling capabilities. Features like high wattage and a strong heating element will ensure quicker results, saving you time and energy.

4. Easy to pour: a tea kettle with a gooseneck spout or precision pouring mechanism allows for accurate pouring without any spills or messes. This feature is especially important for precision brewing and pouring techniques. 5. Ergonomic handle: ensure that the tea kettle has a comfortable, heat-resistant handle.

It should provide a secure grip and remain cool to the touch, making it easy and safe to handle. 6. Whistle or indicator: choose a tea kettle with a built-in whistle or convenient indicator to alert you when the water has reached the desired temperature.

This feature prevents overboiling and ensures precise brewing. 7. Easy to clean: look for a tea kettle with a wide opening for easy cleaning, as well as a removable lid or filter for hassle-free maintenance. Dishwasher-safe components are a bonus.

8. Style and design: while functionality is crucial, a tea kettle that complements your kitchen décor can be a great addition. Consider colors, shapes, and finishes that match your personal taste and aesthetic. 9. Price and warranty: compare prices, but also consider the longevity of the kettle.

Look for brands that offer a warranty, ensuring that you’re covered in case of any manufacturing defects or issues. 10. Customer reviews: before making a final decision, read customer reviews to gain insights into other users’ experiences with a particular tea kettle.

This will help you make an informed choice based on real-life usage. Remember to make your selection based on your personal needs and preferences.

Conclusion

To sum up, choosing the right tea kettle for your induction stove is crucial to ensure a seamless brewing experience. Through our review of the best options available, we have considered key factors such as material, design, and functionality. The cuisinart aura stainless steel stovetop teakettle is an excellent choice for its durable construction, modern design, and effortless pouring mechanism.

If you prefer a whistle feature, the oxo good grips classic brushed stainless steel tea kettle is an ideal option, offering safety and convenience. For those seeking a budget-friendly yet efficient option, the circulon sunrise whistling tea kettle stands out with its vibrant colors and quick-heating capabilities.

Remember to consider your personal preferences and needs when making a decision. With any of these tea kettles, you can enjoy the perfect cup of tea, while your induction stove remains protected and highly functional.


How to Choose A Rubber Wood Cutting Board

A rubberwood cutting board can be an excellent addition to your kitchen, offering both functionality and aesthetic appeal. When it comes to selecting the best cutting board for your culinary needs, several factors come into play. 

From the material’s durability and safety to its maintenance and size, making an informed decision can significantly enhance your cooking experience and maintain the sharpness of your knives.

Material Matters: Why Rubber Wood?

Rubber wood is an eco-friendly and sustainable material known for its strength and durability. It’s an ideal choice for a cutting board due to its ability to resist knife marks while being gentle on your knives’ edges. 

This wood type is also known for its antimicrobial properties, preventing the growth of harmful bacteria, and is often a preferred choice for those seeking a hygienic cutting surface.

Durability and Longevity

When selecting a cutting board, longevity is a key factor. Rubber wood cutting boards are appreciated for their sturdiness and ability to withstand heavy use. Their natural density and hardness make them less prone to deep cuts or gouges, ensuring a longer lifespan compared to other types of wooden cutting boards.

Knife-Friendly Surface

The density of rubber wood provides an excellent surface for cutting, being tough enough to resist knife marks but soft enough not to dull the blades of your knives quickly. This characteristic of rubber wood makes it an ideal material for maintaining the sharpness of your knives.

Hygienic Considerations

Maintaining a sanitary kitchen environment is crucial. Rubber wood possesses natural antibacterial properties, making it inherently hygienic. This wood type inhibits the growth of bacteria and other pathogens, making it a safe choice for food preparation.

Ease of Maintenance

Rubber wood cutting boards are relatively easy to maintain. Regularly oiling the surface with food-grade mineral oil helps to retain the board’s integrity and prevent it from drying out. To clean the board, gentle hand washing with mild soap and warm water is recommended. Avoid soaking the board, and placing it in the dishwasher will help prolong its life.

Size and Thickness

The size and thickness of the cutting board can significantly impact its functionality. The ideal dimensions should be chosen based on your kitchen space and cooking needs. While larger boards offer more cutting space, they might need to be more practical for smaller kitchens. Similarly, the thickness of the board can affect its weight and sturdiness.

Aesthetics and Design

Apart from its functionality, the visual appeal of a rubber wood cutting board can enhance your kitchen decor. Rubber wood’s natural grains and colors can add an elegant touch to your culinary space.

Where to Purchase a High-Quality Rubber Wood Cutting Board

When looking to purchase a rubber wood cutting board, consider reputable retailers or online marketplaces that specialize in kitchenware. Ensure the product is made from high-quality rubber wood and complies with food safety standards. Reading customer reviews and researching the brand’s reputation can guide you in making an informed decision.

Conclusion

A rubberwood cutting board is an excellent addition to any kitchen, providing durability, knife-friendliness, and natural antimicrobial properties. Its maintenance is relatively straightforward, and its visual appeal can complement your kitchen decor. 

By considering factors such as material, durability, hygiene, maintenance, size, and aesthetics, you can select the best rubber wood-cutting board that meets your culinary needs.

FAQs on How to Choose A Rubber Wood Cutting Board

How do I choose a wooden cutting board?

When choosing a wooden cutting board, consider factors like material durability, maintenance, size, and hygiene. Opt for hardwoods like maple, walnut, or rubber wood for durability and knife-friendliness.

What are the cons of rubber cutting boards?

While rubber cutting boards are generally durable and knife-friendly, they may be heavier than other materials and can be more expensive compared to some other types of cutting boards.

What are ideal woods for cutting boards?

Ideal woods for cutting boards include hardwoods such as maple, walnut, and rubber wood. These woods are durable, knife-friendly, and have natural antibacterial properties.

What woods to avoid for cutting boards?

Woods that are too soft or porous, such as pine or cedar, should be avoided for cutting boards. These woods are more prone to damage and excessive knife marks and can harbor bacteria due to their porous nature.

How to Clean a Pizza Screen: The Ultimate Guide

Cleaning a pizza screen may seem like a simple task, but ensuring it is done effectively and efficiently is crucial for maintaining the quality of your pizza and the longevity of your equipment. A pizza screen, a mesh disc used in baking pizzas, can accumulate grease, food particles, and debris over time, impacting the taste and quality of your pizzas if not cleaned properly. 

In this comprehensive guide, we will delve into the best methods and techniques to clean a pizza screen effectively, ensuring its longevity and the high quality of your pizzas.

Understanding the Importance of Clean Pizza Screens

Pizza screens are integral tools in the pizza-making process. They facilitate even cooking by allowing heat to circulate the pizza, resulting in a crispy crust and evenly melted cheese. 

However, these screens can quickly become clogged with food particles and grease after repeated use. Failure to clean them properly can affect the taste and texture of your pizzas.

Cleaning your pizza screens regularly is essential not only for hygiene but also for maintaining the integrity of your equipment. Neglecting this maintenance can lead to a buildup of residue that affects the flavor of your pizzas and can potentially damage your screens, necessitating premature replacements.

Steps for Cleaning a Pizza Screen

Gather Necessary Materials

Before beginning the cleaning process, gather the following materials:

  • Dishwashing detergent or soap
  • Soft-bristled brush or sponge
  • Hot water
  • Towel or drying rack

Preparation

Start by allowing the pizza screen to cool down. Cleaning a hot screen can be hazardous and less effective. Remove any food remnants on the screen using a soft cloth or paper towel.

Hand Washing Method

  • Fill a sink or basin with hot water.
  • Add dishwashing detergent or soap to create a cleaning solution.
  • Immerse the pizza screen in the solution and allow it to soak for a few minutes.
  • Gently scrub the screen with a soft-bristled brush or sponge to remove food particles and grease.
  • Rinse the screen thoroughly under hot running water to remove all detergent residue.

Drying

After cleaning, pat the screen dry with a clean towel or place it on a drying rack to air dry completely before storing or using it again.

Tips for Effective Cleaning

  • Avoid using abrasive cleaners or scrubbers that may damage the pizza screen.
  • Regular cleaning after each use can prevent the buildup of tough residues.
  • For stubborn, baked-on residue, soak the screen longer or use a specialized cleaner specifically designed for pizza screens.

Final Thoughts

Maintaining clean pizza screens is paramount for both the taste of your pizzas and the durability of your equipment. By following these steps and incorporating them into your regular cleaning routine, you can ensure the longevity of your screens and consistently produce high-quality pizzas.

Now that you have a comprehensive guide on how to clean a pizza screen, implement these steps regularly to keep your equipment in top condition and ensure the delicious taste of your pizzas!

FAQs on How to Clean a Pizza Screen

How do you clean dirty pizza screens?

To clean dirty pizza screens, start by allowing them to cool down, soak them in hot, soapy water, and gently scrub with a soft-bristled brush or sponge. Rinse thoroughly afterward.

How do you cure a pizza screen?

Curing a pizza screen involves washing it thoroughly with hot, soapy water and then oil it lightly with vegetable oil before using it. This process creates a natural, non-stick surface.

Do you spray a pizza screen?

Yes, lightly spraying a pizza screen with cooking spray or brushing it with oil can prevent sticking and help in the cleaning process.

Why did my pizza stick to the screen?

Pizza may stick to the screen due to insufficient curing or seasoning, excessive heat, or lack of proper preparation, such as not using enough oil or cooking spray.

How to clean a pizza screen with baking soda?

Create a paste with baking soda and water. Apply it to the screen, scrub gently, and let it sit for a few minutes before rinsing thoroughly with hot water. This method helps remove stubborn residues effectively.

How to Choose the Right Pizza Screen

When it comes to creating the perfect pizza, there are a multitude of factors that contribute to achieving that ideal, crispy crust and even baking. One often overlooked yet crucial element in the pizza-making process is the pizza screen. 

Selecting the right pizza screen can significantly impact the texture, bake, and overall quality of your pizza. In this comprehensive guide, we’ll delve into the intricate details of choosing the ideal pizza screen for your specific needs.

Understanding the Purpose of a Pizza Screen

Before delving into the selection process, it’s crucial to comprehend the role of a pizza screen in the pizza-making process. Pizza screens are circular, mesh-like pans made from different materials such as aluminum, stainless steel, or even hard coat anodized aluminum. These screens aid in achieving a crispy crust by allowing heat to circulate evenly and ensure thorough baking.

Factors to Consider When Choosing a Pizza Screen

Size and Shape

The size and shape of the pizza screenplay play a pivotal role in determining the outcome of your pizza. Consider the size of the pizza you intend to make; whether personal-sized, standard, or larger, ensuring the screen accommodates the pizza size is essential. 

The shape can vary from round to square, so selecting the right shape aligning with your desired pizza style is crucial.

Material Composition

Pizza screens are available in various materials, each with its unique characteristics. Aluminum screens are lightweight and heat up quickly, while steel screens are durable and offer better heat retention. 

Non-stick coatings can prevent sticking and make the cleaning process more manageable. Understanding the properties of each material is critical in making an informed choice.

Perforation and Design

The pattern and size of perforations in the pizza screen affect heat circulation. More perforations allow for more airflow, resulting in a crispier crust. The design of the screen, whether solid or mesh-like, also impacts how the heat distributes, affecting the texture of the pizza crust.

Selecting the Right Pizza Screen for Your Needs

Home Use

For homemade pizzas, aluminum screens can be a practical choice due to their quick heating properties. Non-stick coatings can ease the cleanup process, making them suitable for convenient use at home.

Professional Use

In a professional setting, where pizzas are made consistently and in larger quantities, steel screens or pans might be a more suitable choice. Steel’s durability and heat retention properties are beneficial for high-frequency use.

Maintaining and Caring for Pizza Screens

Proper care and maintenance of pizza screens can extend their lifespan and ensure consistent performance. Cleaning after each use, avoiding harsh abrasives, and storing them appropriately can prevent rust and damage, preserving their quality for an extended period.

Conclusion

Selecting the right pizza screen is a crucial decision that significantly impacts the quality of your pizzas. By considering factors such as size, material, and design, you can make an informed choice that aligns with your specific pizza-making needs, whether at home or in a professional kitchen.

FAQs on How to Choose the Right Pizza Screen

What size pizza screen do I need?

The size of the pizza screen you need depends on the size of the pizza you intend to make. Ensure the screen accommodates the desired pizza size, whether personal, standard, or larger.

How do I choose a pizza pan?

Consider factors like material, size, and design. Select a material that suits your needs, choose the appropriate size, and pay attention to the perforation design for heat circulation.

Is a pizza screen worth it?

Absolutely! A pizza screen helps achieve an evenly baked crust and prevents sogginess by allowing heat circulation, enhancing the overall quality of your pizza.

What is the difference between a pizza screen and a pizza pan?

A pizza screen is a mesh-like metal screen, often made of aluminum or steel, with perforations for heat circulation. On the other hand, a pizza pan is a solid, flat pan without perforations.

Will pizza stick to a pizza screen?

Typically, pizza doesn’t stick to a pizza screen, especially if it has a non-stick coating. It allows for easy removal and prevents sticking, making cleanup hassle-free.

History of Vermicelli Rice Noodles: A Journey Through Centuries

0

In the realm of culinary delights, the history of vermicelli rice noodles is a captivating narrative intricately woven through time and cultures. These delicate, slender noodles, known for their versatility and ability to complement a wide array of dishes, hold a rich historical significance that traverses various regions and traditions.

Origins and Early History of Vermicelli Rice Noodles

The origins of vermicelli rice noodles can be traced back to ancient China, where their inception dates to over two thousand years ago. Believed to have been introduced during the Han Dynasty, these noodles, made predominantly from rice flour, gained prominence due to their lightness, versatility, and ease of preparation.

The art of making vermicelli rice noodles gradually spread across Asia, becoming an integral part of Asian cuisines. Its migration from China to other regions, including Vietnam, Thailand, and Japan, contributed to the diversification and enrichment of local gastronomy.

Cultural Significance of Vermicelli Rice Noodles

Vermicelli rice noodles became an integral part of cultural celebrations and traditions across Asia. In Vietnamese cuisine, these noodles feature prominently in dishes like Bun Bo Hue, a flavorful beef noodle soup, and Bun Cha, a dish comprising grilled pork with noodles and fresh herbs. 

In Thai cuisine, vermicelli rice noodles are central to the well-known dish Pad Thai, a stir-fried noodle dish often combined with peanuts, vegetables, and proteins, presenting a harmonious blend of flavors.

The symbolic importance of these noodles extends beyond their culinary appeal. They hold a revered place in cultural festivities and rituals, often served during festivals and celebratory occasions, signifying good fortune, longevity, and prosperity.

Evolution and Global Influence 

With globalization and the growing appreciation of Asian cuisine worldwide, vermicelli rice noodles have transcended cultural boundaries. Their adaptability and mild flavor have made them a popular choice not only in traditional Asian recipes but also in fusion dishes and contemporary culinary innovations.

In Western cultures, vermicelli rice noodles have found their way into a myriad of dishes, serving as a base for salads, stir-fries, soups, and more. Their gluten-free nature and light texture have contributed to their increasing popularity among individuals with diverse dietary preferences.

Production and Preparation Techniques

The process of crafting vermicelli rice noodles involves a meticulous methodology. Rice flour is mixed with water to form a dough, which is then extruded through small holes to create the thin, thread-like strands. These delicate strands are steamed, dried, and cut to produce the fine, translucent noodles that are a hallmark of vermicelli.

Cooking vermicelli rice noodles is a straightforward yet essential process. These noodles require soaking in hot water for a few minutes until they achieve a tender, yet slightly firm texture, ready to absorb the flavors of accompanying ingredients in a dish.

Health Benefits and Nutritional Value of Vermicelli Rice Noodles

Vermicelli rice noodles offer several health benefits. Being gluten-free, they cater to individuals with gluten intolerances or allergies. Additionally, they are low in fat and sodium, making them a healthy choice for those seeking a nutritious and light meal option. These noodles are also a source of carbohydrates, providing a quick source of energy.

Conclusion

The history of vermicelli rice noodles encapsulates a fascinating journey that transcends geographical borders and cultural barriers. From its humble beginnings in ancient China to its widespread global popularity, these slender rice noodles continue to tantalize taste buds and serve as a testament to the fusion of diverse culinary traditions.

As a versatile ingredient with a rich historical background, vermicelli rice noodles hold a special place in the world of gastronomy. Whether integrated into traditional Asian dishes or reimagined in innovative recipes, these noodles continue to delight food enthusiasts globally.

FAQs on History of Vermicelli Rice Noodles

Is vermicelli from Vietnam?

Vermicelli has roots in China but is widely used in Vietnamese cuisine. It’s a significant component in popular Vietnamese dishes like Bun Bo Hue and Bun Cha.

Which country eats vermicelli?

Vermicelli is enjoyed across various countries in Asia, including Vietnam, Thailand, China, and Japan. Its versatility makes it a staple in many Asian cuisines.

Is vermicelli Italian or Chinese?

The term “vermicelli” is of Italian origin, but rice vermicelli has its roots in Chinese cuisine. It’s used in a variety of Asian dishes and differs from Italian pasta.

Who invented rice vermicelli?

Rice vermicelli is believed to have originated in ancient China during the Han Dynasty over two thousand years ago. Its creation is attributed to Chinese culinary traditions.